

Nowdays, There are different displays resolution in the market, such as 4K 60hz, 4K 30hz, or 1080p, however, with the trending of 4K60hz video distribution switcher widely used , some customers may run into the problem that some displays don’t show pictures.
Below is the our Seamless presentation switcher 5×1 connection steps for how to set the lower resolution to make the display work.

First, our Seamless presentation switcher 5×1 is a 4k60hz input and output switcher. the inner default output is 4k60hz, while, when your display resolution is 1080p, so there will be no picture after connection. Please load the web to check the switcher status and set the output to be lower resolution.

As you can see this presentation switcher support HDBaset 3.0, please use a better Cat6a or Cat7 (recommend) cable, after connecting with the Lan cable, please make sure the HDbaset port green light is on .and the Link light at the front of receiver is on.

Then you can load the web to check the HDMI Port, HDBaset Port , USB-C, Dante, Audio port status, and set the resolution based on your sources and displays. Below is the Web GUI User Guide
Step 1: Get the current IP Address.
The default IP address is 192.168.0.100 (when the system is not connected to a router). You can
get the current switch IP address via RS-232 command control. Send the ASCII command “r ip
addr” through a Serial Command tool, then you’ll get the current IP address (The IP address is
variable, depending on what the specific machine returns).
For the details of RS-232 control, please refer to “9. RS-232 Control Command”.
Step 2: Connect the LAN port of the presentation switch to a PC with an UTP cable (as
shown in the following figure), and set the IP address of the PC to be in the same network
segment with the presentation switch.

Step 3: Input the current IP address of switch into your browser on the PC to enter Web GUI
interface.

The default usernames and passwords are as below:
Username User Admin
Password user admin
Select the username “User” and input the password “user”, then click the “Login” button to
enter the User page.

You can do the following operations on the User page:
① Preset: Recall the preset application scenes.
② Video: Set the multiview display mode, select input source for each screen, freeze the
screen or mute the audio.
③ Master Out: Set the audio volume or mute/unmute the audio for Master Out. You can
respectively turn on/off the HDMI/HDBT Out, Line Out or Dante Out.
In the Login interface, select the username “Admin” and input the password “admin”, then click
the “Login” button to enter the Information page of the Admin interface.

The Information page provides basic information about the model name, software version,
IP information and the current machine temperature.
Besides, you can do the following operations on each page of the Admin interface.
① Display and set the audio volume of Master Out. Click the volume icons to increase/
decrease the audio volume of Master Out, or click the mute icon to mute/unmute the audio
of Master Out. When muted, the mute icon displays red.
② Display the current username (User or Admin).
③ Click the power icon to power on the switch or set it in standby mode.
④ Click the logout icon to logout and return to the login interface.

The Status page displays the input & output port connection status, input & output resolution,
Color Space, Color Depth and HDCP.

You can set up to 5 preset scenes on the Preset page.
① Preset Name: You can name the preset scene. (Chinese name is not supported.)
② Preset Save: Click the Save button to save the scene.
③ Preset Clear: Click the Clear button to clear the saved scene.
④ Preset Recall: Click the Recall button to recall the saved scene.

You can do the following operations on the EDID page.
① Click the drop-down list to set EDID for each input port. The EDID list is as below.

② Click the drop-down list to select USB-C 1\USB-C 2\HDMI 3\HDMI 4\HDMI 5\HDMI OUT\
HDBT OUT for EDID download.
③ Click the Download button to download EDID and generate a .bin file.
④ Display the downloaded EDID .bin file.
⑤ Click the Load EDID button to download user-defined EDID. Please note that only. bin files
are supported.
⑥ Click the Save EDID button to save the user-defined EDID.
Switch Mode
① Auto Switch: You can turn on/off the auto switching function.
② Fallback Input: Click the drop-down list to select Auto\USB-C 1\USB-C 2\HDMI 3\HDMI 4\
HDMI 5 as the signal source of Fallback input. When the auto switching function is turned on
and the current input source is disconnected, the Fallback input signal source will be selected
automatically. When the Fallback input is set to be Auto, the switch will detect and switch to
the signal with the auto switching sequence of USB-C 1>USB-C 2->HDMI 3->HDMI 4->HDMI 5.
Note: The auto switching function is available only in single screen display mode.
Window layout
① Window layout: Click the drop-down list to select the display mode (1.Single\2.PIP\3.PBP\
4.Triple\5.Quad).
② Freeze: You can freeze the screen.
③ AV Mute: You can mute the audio and video.
④ PIP Position: Click the drop-down list to select the display position in PIP display mode. ⑤ PIP Size: Click the drop-down list to select the display size in PIP display mode. ⑥ Display Mode: Click the drop-down list to select the display mode in PBP\Triple\Quad
display mode.
⑦ Display Aspect: Click the drop-down list to select the display aspect in PBP\Triple\Quad
display mode.
⑧ Border: Click the drop-down list to select the border and border color in PBP\Triple\Quad
display mode.
Output Setting
① Resolution: Click the drop-down list to select the output resolution. The output resolution
list is as following.

Switch Mode
① Auto Switch: You can turn on/off the auto switching function.
② Fallback Input: Click the drop-down list to select Auto\USB-C 1\USB-C 2\HDMI 3\HDMI 4\
HDMI 5 as the signal source of Fallback input. When the auto switching function is turned on
and the current input source is disconnected, the Fallback input signal source will be selected
automatically. When the Fallback input is set to be Auto, the switch will detect and switch to
the signal with the auto switching sequence of USB-C 1>USB-C 2->HDMI 3->HDMI 4->HDMI 5.
Note: The auto switching function is available only in single screen display mode.
Window layout
① Window layout: Click the drop-down list to select the display mode (1.Single\2.PIP\3.PBP\4.Triple\5.Quad).
② Freeze: You can freeze the screen.
③ AV Mute: You can mute the audio and video.
④ PIP Position: Click the drop-down list to select the display position in PIP display mode.
⑤ PIP Size: Click the drop-down list to select the display size in PIP display mode.
⑥ Display Mode: Click the drop-down list to select the display mode in PBP\Triple\Quad
display mode.
⑦ Display Aspect: Click the drop-down list to select the display aspect in PBP\Triple\Quad
display mode.
⑧ Border: Click the drop-down list to select the border and border color in PBP\Triple\Quad
display mode.
Output Setting
① Resolution: Click the drop-down list to select the output resolution. The output resolution
list is as following.

Note: When the output resolution is set to Auto, the switch will output the matching
resolution based on the EDID of the back-end TV.
② HDMI HDCP: Click the drop-down list to select the HDMI HDCP version.
③ HDBT HDCP: Click the drop-down list to select the HDBT HDCP version.
After setting up, click “Save” to take effect.

Source Select
① Main In: Click the drop-down list to select the signal source for Main In.
② HDMI/HDBT Out: Click the drop-down list to select the signal source for HDMI/HDBT Out.
③ Line Out: Click the drop-down list to select the signal source for Line Out.
④ Dante Out: Click the drop-down list to select the signal source for Dante Out.
After setting up, click “Save” to take effect.
Input Setting: You can respectively set the output volume or mute/unmute the audio for
Main In (HDMI/USB-C In)\Line In\Dante In.
Output Setting
① Master Out: You can respectively set the output volume or mute/unmute the audio for
HDMI/HDBT Out\Line Out\Dante Out, or set together when turning on three options
synchronously.
② HDMI/HDBT Out\Line Out\Dante Out: Click the drop-down list of Mix to select the audio
output channel for HDMI/HDBT Out\Line Out\Dante Out. You can set the delay, increase/
decrease the audio or mute/unmute the audio.
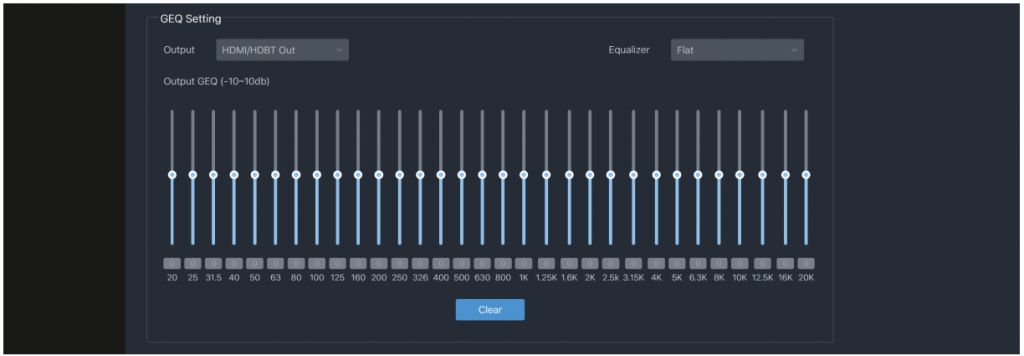
GEQ Setting
① Output: Click the drop-down list to select the output channel.
② Equalizer: Click the drop-down list to set the equalizer.
Flat: Set all EG to 0db.
Custom1: Set EQ for custom 1.
Custom2: Set EQ for custom 2.
Custom3: Set EQ for custom 3.
Custom4: Set EQ for custom 4.
Custom5: Set EQ for custom 5
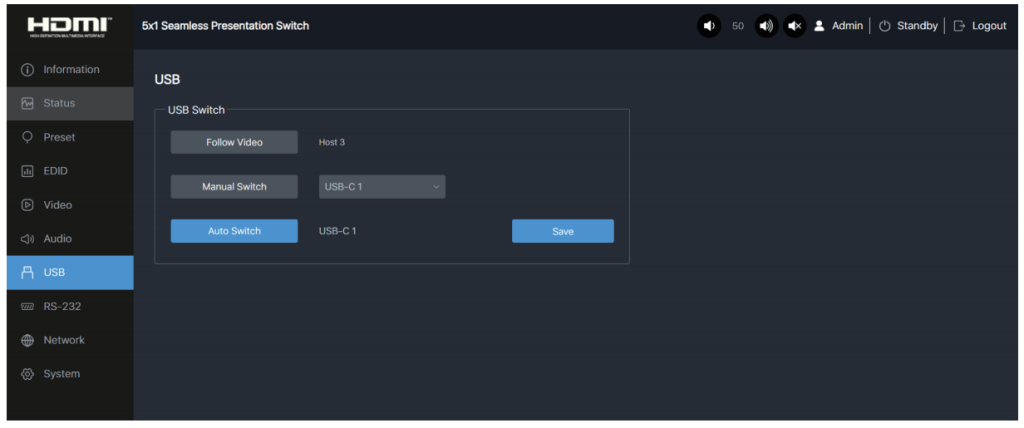
USB Switch
① Follow Video: Click this button to set the USB transmission follow the video. It will follow
the video output of window 1 in multiview mode.
② Manual Switch: Switch to USB-C 1\USB-C 2\Host 3 manually.
③ Auto Switch: Detect and switch to USB-C 1\USB-C 2\Host 3 automatically.
After setting up, click “Save” to take effect.
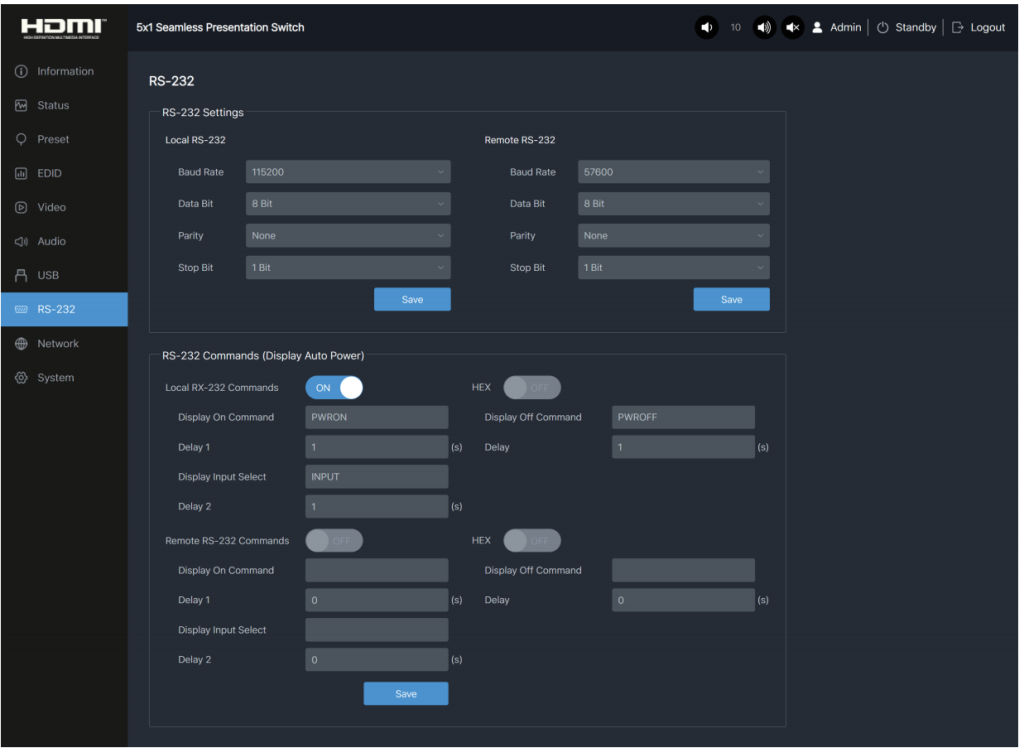
RS-232 Settings
① Local RS-232: You can set the Baud Rate, Data Bit, Parity and Stop Bit for the RS-232
port of the transmitter.
② Remote RS-232: You can set the Baud Rate, Data Bit, Parity and Stop Bit for the
RS-232 port of the receiver.
RS-232 Commands (Display Auto Power)
① Local/Remote RS-232 Commands: You can turn on/off the local/remote RS-232
commands and hex.
② Display On/Off Command: You can input the display on/off command of the device.
③ Delay 1: You can set the delay time for the next action (such as send the Display Input
Select command).
④ Display Input Select: You can input the command of switching the input channel for the
display device.
⑤ Delay 2: You can set the delay time for the next action after sending the Display Input
Select command.
After setting up, click “Save” to take effect.
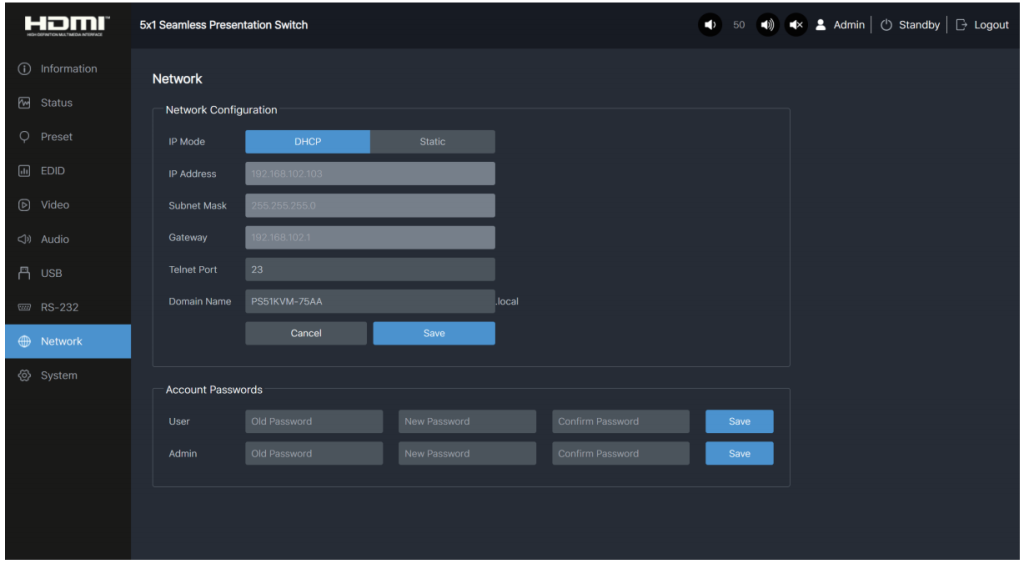
① Network Configuration: You can set the IP Mode (DHCP/Static), IP Address, Subnet
Mask, Gateway, Telnet Port and Domain Name.
Note: The Domain Name “PS51KVM-75AA.local” can be used to login the Web GUI.
② Account Passwords: You can modify the login password for User and Admin.
After setting up, click “Save” to take effect.
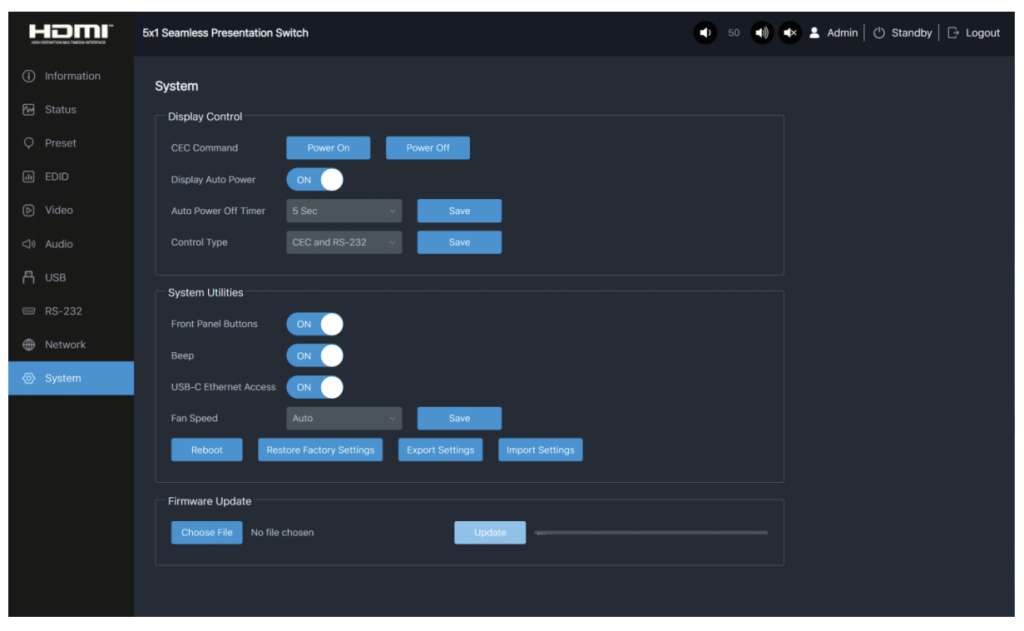
Display Control
① CEC Command: You can power on/off the CEC command.
② Display Auto Power: You can turn on/off the Display Auto Power. When it is set to ON,
you can control the display device power on/off or switch the port based on the power status
(power on/standby) or the signal input status of the transmitter by sending serial port or CEC
Power On/Off command.
③ Auto Power off Timer: Click the drop-down list to select the delay time for sending the
command to turn off the display device when the transmitter is in standby mode or there is no signal input.
④ Control Type: Click the drop-down list to select the control type.
System Utilities
① Front Panel Buttons: Click “ON/OFF” to lock/unlock panel buttons. “On” indicates that
panel buttons are available; “OFF” indicates panel buttons are unavailable.
② Beep: Click “ON/OFF” to turn on/off the beep.
③ USB-C Ethernet Access: Click “ON/OFF” to turn on/off the Ethernet access function of USB-C.
④ Fan Speed: Click the drop-down list to set the fan speed.
⑤ Reboot: Click “Reboot” to reboot the switch.
⑥ Restore Factory Settings: Click this button to restore the switch to factory settings.
⑦ Export Settings: Click this button to export configuration files.
⑧ Import Settings: Click this button to import configuration files.
Firmware Update: You can update the software of MCU, Web, Scaler or receiver. Click
“Choose File” to select the update file, then click “Update” to start update. When the progress
bar reaches 100%, the update is complete.
Above steps just for reference, if you have any questions for installation or setting, you can contact with us directly, our R&D engineer will feedback to you 24/7, E-mail: 1@sz-sinowell.com, WhatsApp: +8613728685427
#presentationswitch #wirelesspresentation #seamlessswitch #videodisgtribution #avintegration #proav
